


You’re an exhibitor and someone says to you, “Tell me about your trade show floor plan.” Do they mean the show’s overall floor plan or the floor plan of your exhibit? In this article, we’re going to discuss the latter. We’ll address choosing the optimal space on the trade show floor in another article. That topic is a bit like casino odds in Vegas. It depends on the venue, the game you’re playing, and how comfortable you are with risk.
On the other hand, the floor plan of your exhibit doesn’t rely on luck. But it does require planning and a strategy. Your booth size will determine overall square footage, but there’s so much more than just the size of the booth. Is it an inline, an island, or a peninsula? Is it on the right side of the exhibit hall or the left side? Are you on the end of an aisle or does the aisle T into the middle of your booth?
Those physical constraints matter when designing the floor plan of your exhibit. You would be surprised how often exhibitors can’t visualize a 200, 400, or even 800 sq. foot space. In renderings, the exhibit space always seems large (or large enough), and the distance between counters, towers, furniture, and lightboxes more than sufficient. In reality, it’s often tight… too tight which can hinder easy access into the booth and interactions with potential clients. Let’s discuss how to maximize your trade show floor space without feeling like you’re squeezing through the racks at your local discount clothing store.
The Importance of a Trade Show Floor Plan
Let’s be honest. Visualizing spatial dimensions is challenging. Most of us, if asked to draw a 20 ft x 20 ft. box on the floor, would struggle not only with the 20 ft. length but also with just drawing a somewhat perfect square. And that’s OK. That’s why there are CAD and rendering programs, along with exhibit designers, project managers, and detailers. They live in those spaces every day. Not literally, but you know what we mean. .
A well-designed trade show floor plan entices attendees into your booth through both visual and text messages and a comfortable and logical layout. In addition, the floor plan allows your staff to be efficient with your trade show strategy, whether that’s education via workstations, conversations at sofas or chairs, or demos using a stage and theater-style seating. Or, all of these and more.
All too often, exhibitors will fall in love with an exhibit without considering whether the floor plan aligns with their trade show strategy. It’s the proverbial putting the cart before the horse. Professional exhibit designers won’t allow that to happen. They’ll focus on your goals and strategy first. They’ll quiz you about what worked in the past (and what didn’t), ask about the size of your trade show staff, and request a map or link to the show’s floor plan. They’ll want to know what direction to position the booth, the size and position of the aisles, the height of the show hall roof, and if there are any visual impediments, like columns next to your booth. Even knowing if you’re next to the bathrooms or across from the cafe can assist them with arranging the space to maximize its potential.
Creating Your Trade Show Booth Floor Plan: A Step-by-Step Guide
A well-designed trade show exhibit floor plan is crucial for attracting attendees, showcasing your brand, and achieving your trade show goals. Exhibit houses specialize in trade show design and execution. They have a team of experienced professionals who understand traffic flow, attendee behavior, and the latest trends in booth design.
Here’s a step-by-step guide to help you create a winning plan:
1. Define Your Goals and Audience:
- What are your objectives for the trade show? Is it generating leads, brand awareness, product demos, or a combination?
- Who is your target audience? Understanding their needs and interests will guide your booth design and activities.
2. Research the Venue:
- Obtain a detailed floor plan of the exhibit hall from the show organizer.
- Learn about booth sizes and configurations offered by the venue.
- Identify key features like entrances, exits, restrooms, concession stands, and any potential obstructions (pillars, stages).
- Consider factors like lighting and noise levels that might impact your booth design.
3. Design Your Booth Layout:
- Start with traffic flow: How will attendees navigate your booth? Design an open and inviting layout that encourages them to explore.
- Consider your booth size and functionalities: Allocate space for product displays, demonstrations, presentations, storage, and networking.
- Position key elements strategically: Place high-impact visuals and lead capture areas in high-traffic zones.
- Ensure accessibility: Allow for comfortable movement for all attendees, including those with disabilities.
4. Optimize the Attendee Experience:
- Create a clear visual hierarchy: Use signage, lighting, and product placement to guide attendees through your booth.
- Incorporate interactive elements: Demos, contests, or giveaways can attract attention and engage visitors.
- Designate a comfortable area for conversations: Provide seating or a dedicated space for attendees to connect with your team.
5. Refine and Get Feedback:
- Review your floor plan to ensure it aligns with your goals and facilitates a seamless attendee experience.
- Seek feedback from colleagues, potential vendors, or even past attendees for valuable insights.
Optimizing Exhibit Layout for Maximum Engagement
Inlines
Inline booths are the most common and budget-friendly option at trade shows. They require some strategic planning to maximize their impact. Here are some tips for optimizing the floor plan of your inline trade show exhibit:
Understanding Your Goals:
- What are you hoping to achieve at the show? Generate leads? Showcase a new product? Increase brand awareness? Knowing your goals will guide your layout decisions.
Optimizing Traffic Flow:
- Don’t create a dead end! Encourage a natural flow through the booth with an open and inviting entrance.
- Consider a “conversation corner” with comfortable seating at the back of the booth for in-depth interactions.
- Leave enough space between displays and furniture to avoid congestion and allow attendees to move freely.
Making the Most of Limited Space:
- Utilize vertical space! Eye-catching signage, hanging displays, or product shelves can draw attention without sacrificing floor space. Perimeter inlines are often permitted to go over 8 ft, which means you have the impact of an island but at the price of an inline. Check with show management for perimeter booths and guidelines.
- Interactive elements like demos or product trials can engage attendees and keep them lingering.
- Strategic lighting can highlight key products or displays.
- Interactive displays like touch screens or virtual reality experiences can create a memorable experience.
Islands
Island booths at trade shows offer more space and freedom compared to inline booths. Here’s how to optimize the floor plan of your island exhibit to maximize engagement and achieve your trade show goals:
Goals First:
- Define your objectives. Are you launching a product? Generating leads? Boosting brand awareness? This will guide your layout to best suit your needs.
Creating a Welcoming Flow:
- Multiple entry points: Don’t block access with a single entrance. Allow attendees to enter from any side, encouraging exploration.
- Circular flow: Design the layout to guide attendees on a natural loop around the booth, maximizing their exposure to your offerings.
- Open walkways: Leave ample space between displays and furniture to avoid congestion and allow for comfortable movement.
Utilizing Space Effectively:
- Think three-dimensional! Maximize vertical space with hanging displays, product shelves, or digital signage.
- Storage solutions: Incorporate hidden storage for brochures, giveaways, or personal belongings to keep the main area clutter-free.
- Dedicated zones: Create distinct areas within the booth for different purposes. For example, a product demo area, a registration area for lead capture, and a comfortable seating area for consultations.
Engaging Attendees:
- Focal point: Designate a central attraction to draw attendees in. This could be a product display, live demonstration, or interactive experience.
- Interactive elements: Incorporate touchscreens, product trials, or virtual reality experiences to grab attention and encourage engagement.
- Clear messaging: Use concise visuals and impactful signage to communicate your brand message and key offerings.
Peninsulas
A peninsula trade show exhibit offers a nice balance between the openness of an island booth and the directed flow of an inline booth. Here’s how to optimize the floor plan of your peninsula exhibit:
Understanding the Advantages:
- Two open sides: This allows for more natural traffic flow compared to inline booths while still creating a defined space.
- Strategic placement: Peninsula booths are often positioned at the end of aisles or corners, offering increased visibility.
Optimizing Traffic Flow:
- Embrace the “V” shape: Design the layout to encourage a natural flow in a “V” pattern, guiding attendees past key displays on both sides.
- Multiple entry points: Since you have two open sides, avoid blocking access with a single entrance. Allow attendees to enter from either side.
- Consider a “meeting zone” at the closed back of the booth for focused interactions or product demonstrations.
Maximizing Space:
- Utilize both sides strategically: One side can showcase larger product displays or create a central attraction, while the other can be dedicated to interactive elements, lead capture, or a registration area.
- Vertical displays: Don’t waste wall space! Utilize hanging displays or product shelves along both open sides to showcase your offerings.
- Storage solutions: Incorporate hidden storage under counters or behind displays to keep the main area clutter-free.
Standing Out and Engaging:
- Strong visuals on both sides: Since attendees can approach from either direction, ensure impactful visuals and branding are present on both open sides of the booth.
- Interactive elements: Incorporate engaging activities on both sides, like product trials, touchscreens, or live demonstrations, to attract attention and encourage exploration.
- Staff on both sides: Have staff positioned strategically on both sides of the booth to greet attendees, answer questions, and capture leads.
In the end, the most important tool in your booth layout toolbox is a friendly and knowledgeable staff. An approachable will always be your best asset. Train them to engage attendees, answer questions, and take extensive notes after the conversation.
3 Examples of Professional Trade Show Floor Plan Design
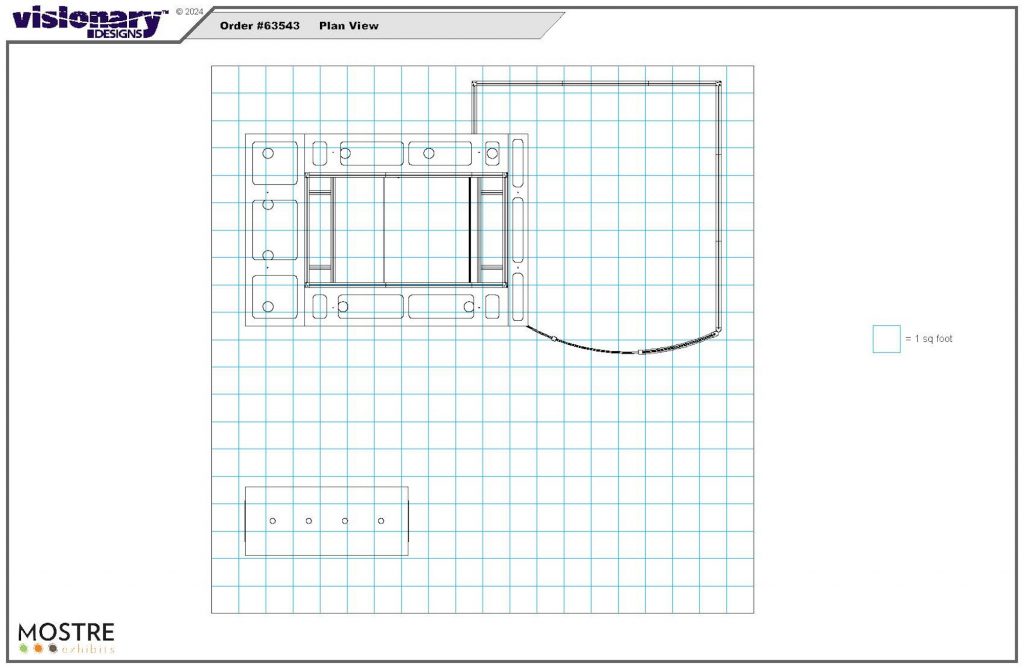
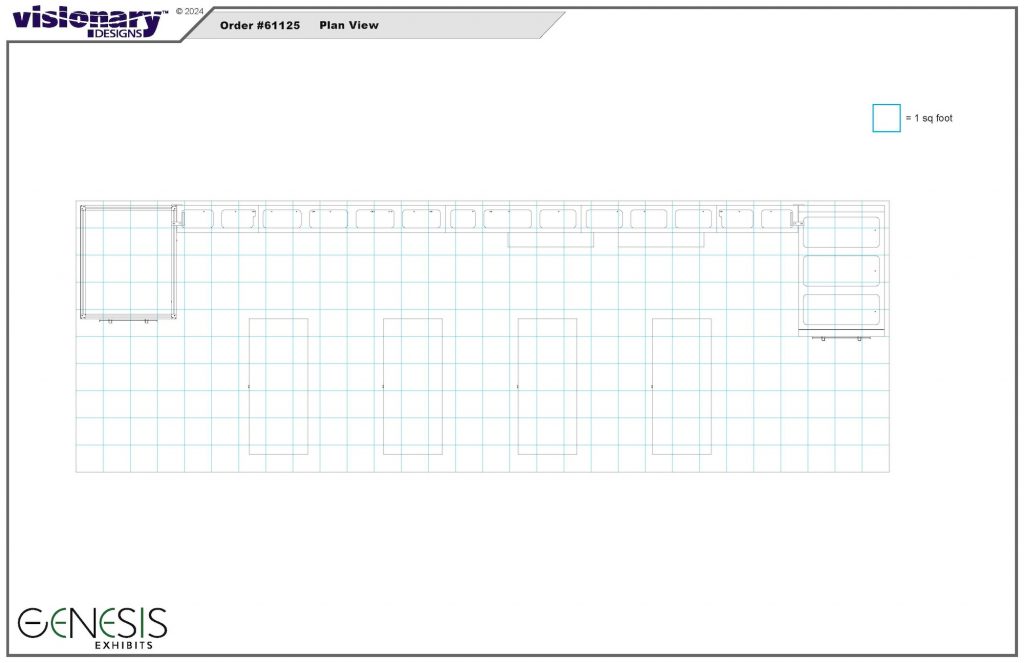
Trade show plan views show a booth on a grid with each grid = 1 sq foot. Plan views are helpful for several reasons. First, they are ideal for mapping the electrical layout. The 1 ft. grids allow you to show exactly how and where the cords should go. Secondly, they provide visual spacing.
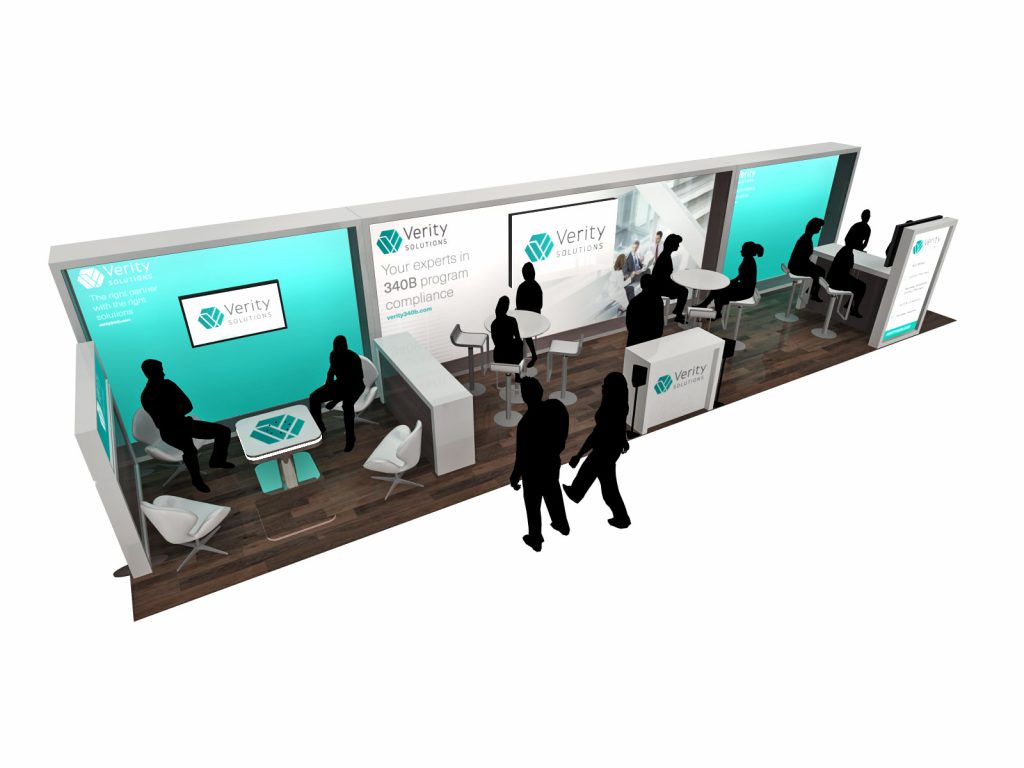
For example, the distance from the backwall to the reception counter, which typically has a high traffic pattern or the distance of a demo workstation to the aisle. If the workstation is too close to the aisle, the attendee may be forced to stand in a crowded aisle instead of in your booth. Below are three three floor plans along with a rendering of the exhibit.
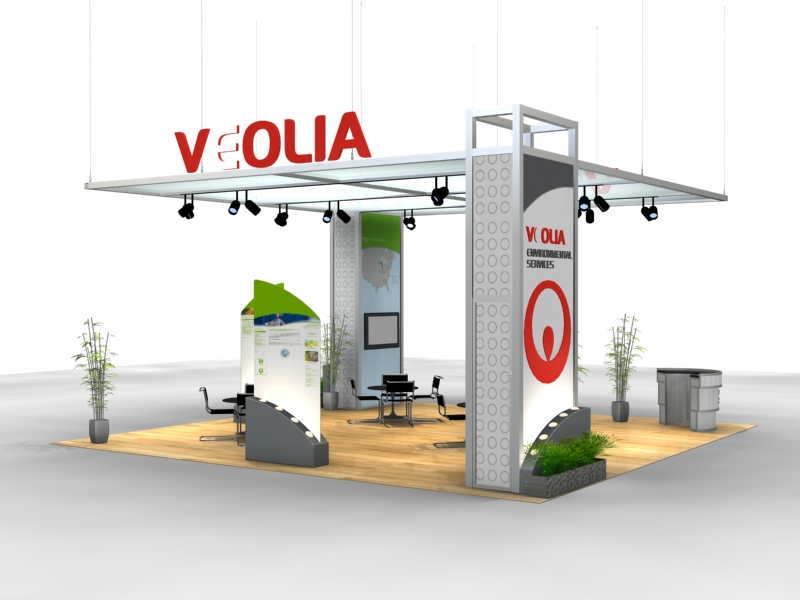
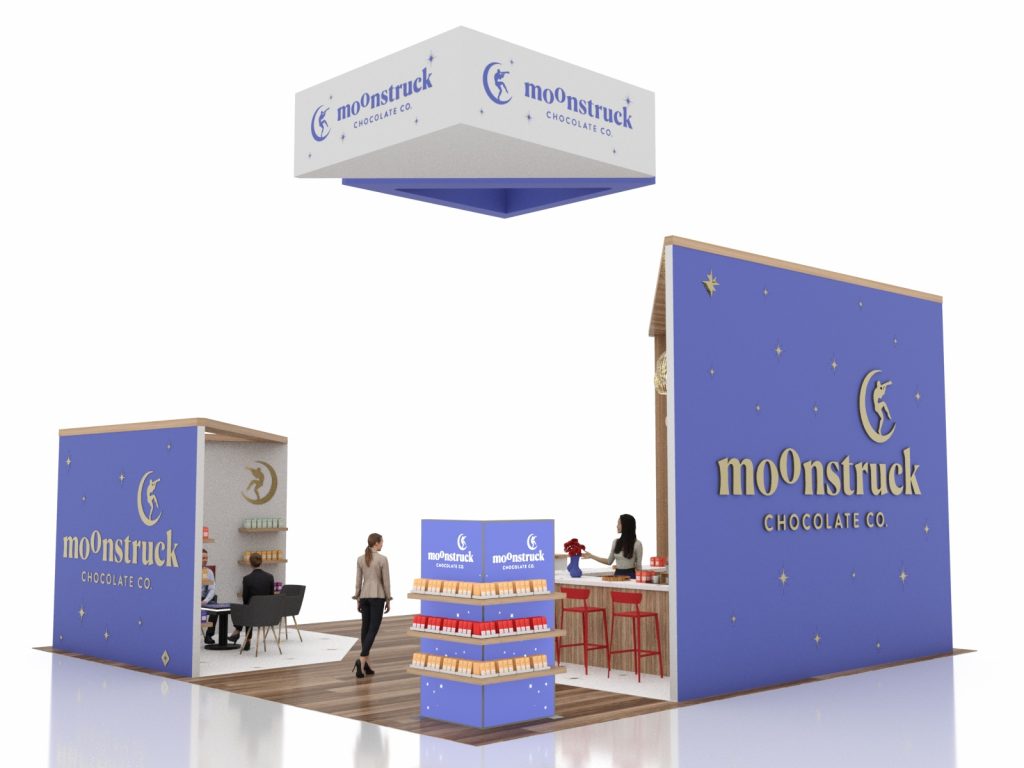
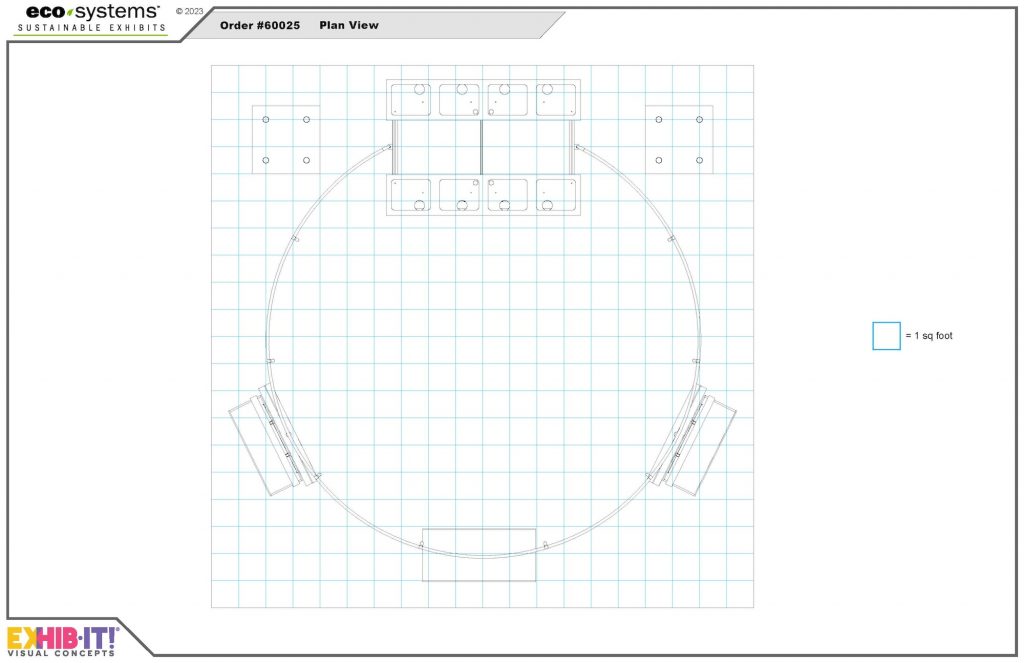
ECO-4100 | 20 x 20 Island. Islands offer access from four sides but not every exhibit design takes advantage of that feature. The ECO-4100 does. The floor plan creates a series of workspaces, starting with the “can’t miss” reception counter. From there, guests are guided to opposing workstations. More in-depth conversations take place in the casual lounge in the center of the booth. In addition, the ECO-4100 uses the vertical space for optimal branding with a 16 ft. tower and ring header. This opens up space on the floor normally reserved for large-format graphics.
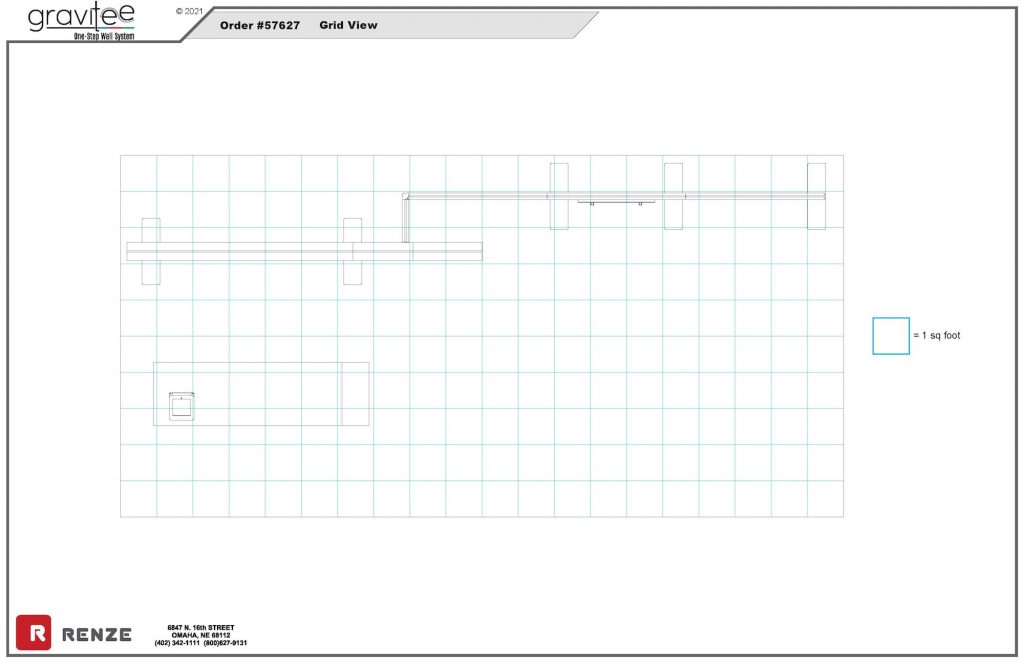
GK-2986 | 10 x 20 Inline. Meeting spaces are a popular trend in exhibit design. That’s easy in an island configuration but can be tricky in an inline. The GK-2986 strikes a balance with a distinctive reception counter with an iPad mount placed against the background of a large backlit graphic. The other side of the booth has ample space for a table and chairs (or even soft seating) all framed by a large graphic and monitor. There’s even closet storage for product samples, literature, or personal belongings.
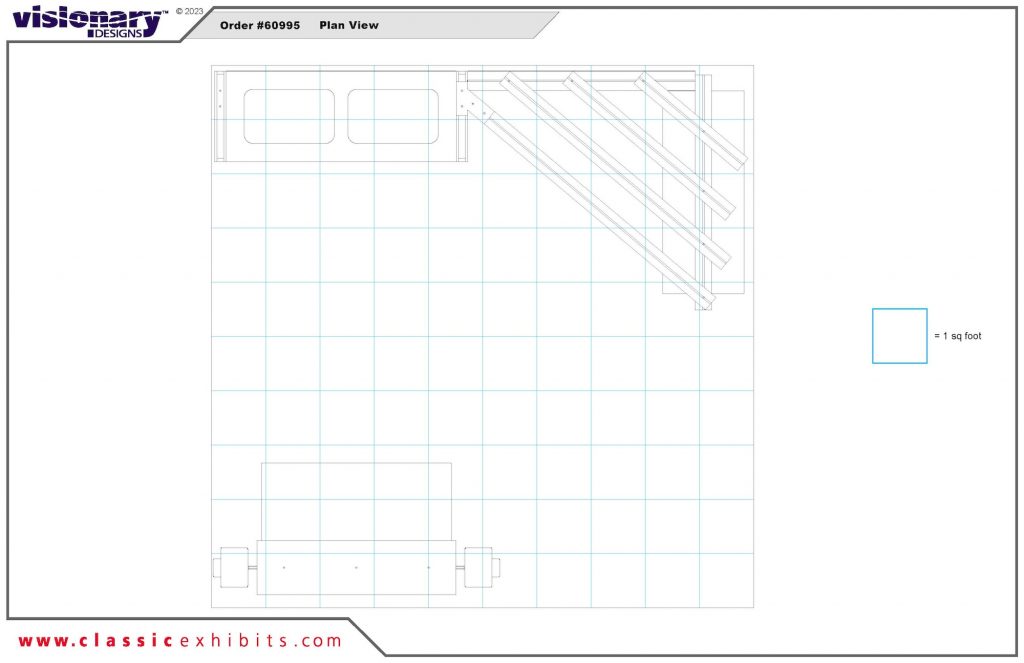
VK-1366 | 10 x 10 Inline. Small booth spaces, like a 10 x 10, can be challenging. Exhibitors want to show attendees everything they do, which isn’t realistic. There’s a balance. The VK-1366 shows this balance, starting with a backlit reception counter with storage. The counter graphic is large enough (and bright enough) to attract attention but not so big that it blocks access to the booth. The backwall has two backlit graphics for dual messaging and a pergola/shelving structure for physical products.
Elevate Your Event Presence With a Custom Trade Show Floor Plan
Understanding how a well-designed floor plan can supercharge your exhibit marketing potential gives you a decisive advantage over your competition. This is where having a solid trade show planning guide becomes invaluable. Exhibit space is expensive, so it pays to create an environment that maximizes your potential to attract attendees and turn leads into sales. Working with a professional exhibit designer is the best place to start. They’ll take your goals and your budget and create a design tailor-made to your needs.
Classic Exhibits has been designing and building trade show exhibit solutions since 1993. We’ve been honored as an Exhibitor Magazine Find-It Top 40 Exhibit Producers and an Event Marketer Fab 50 Exhibit Builders multiple times. Along with numerous Portable Modular Awards. With over 200 Distributor Partners throughout North America, there’s a Classic representative closer by. Contact us today whether you need a durable hand sanitizer stand built to last, a rental display guaranteed to attract trade show attendees, or a custom 30 x 40 exhibit with all the bells and whistles. We’re not just different. We’re better.