


Let’s start by clarifying the difference between a trade show booth layout and booth regulations. The former is all about design. The latter is about the specific trade show guidelines. For example, this page summaries the most common trade show regulations in North America, which differ from trade show regulations in Europe and Asia. Knowing them, even on a basic level, prevents being “asked” to modify your exhibit or even take it down at a trade show. Both can be costly to any exhibitor. And in some cases catastrophic.
Trade show booth layout is all about meshing your trade show goals and strategy with the exhibit design. Exhibit designers love, love, love these conversations because it allows them to be both creative and practical. Plus, it saves everyone time during the exhibit design processes. In this article, we’ll explore how a logical booth layout, whether it’s a 10 x 10 inline or a 30 x 30 island, can maximize your success on the trade show floor.
Why Trade Show Booth Layout Matters
At some point, we’ve all searched for an apartment to rent or a house to buy. And you’ve probably said (at least in your head), “I wonder why they put the kitchen there” or “That seems like an odd layout for a master bedroom.” Layout matters to people, and in a trade show booth where space is limited, getting it right is critical.
Consider what you’re trying to accomplish at a trade show. You want foot traffic in your booth, engagement with attendees, and visibility of your brand and marketing message. In addition, you may need accessible storage, demo areas, and a reception counter. Get it wrong and one area of the booth may be congested and another area empty. Or the game that’s drawing crowds is next to the lounge where you’re trying to have conversations with clients. Even something as simple as the location of a monitor can matter. A massive monitor in a tight area may be challenging to watch.
Layout isn’t just the floor plan of your booth. It’s also how attendees enter and exit your booth. In an inline booth, attendees can only enter the space from one aisle (two if you’re on a corner). Islands can have as many as four entrances, depending on the design. The saying, “Putting the cart before the horse” is appropriate in this situation. We all love the design phase of a new exhibit, but the design must start with your marketing strategy (i.e., what you’re trying to accomplish at the trade show). And that strategy, like meetings with existing clients or hiring a professional presenter to introduce a new product or service, will dictate the booth layout. Get it right and attendees will flock to your booth. Get it wrong and they’ll avoid it.
Booth Layout Basics: Traffic Flow, Focal Points & Function
A well-designed trade show booth layout is crucial for attracting visitors, engaging them, and achieving your event goals. We’re already touched on starting with your marketing goals and the booth type (inline, island, or peninsula). Here are some additional booth layout basics:
Traffic Flow. The goal is to encourage people to enter and explore your booth without feeling crowded.
- Inviting Entrance: Avoid blocking the entrance with furniture or large displays. Create a welcoming and clear path for attendees to walk in.
- Clear Walkways: Leave ample space between displays, furniture, and people to prevent congestion. A good rule of thumb is to allow enough room for comfortable movement.
- Strategic Layout: Guide attendees through your booth to see your key offerings. You can use a circular or “V” shape layout to ensure they see everything you want them to.
Key Elements. A successful booth is more than just a backdrop. Think about the following functional and visual elements:
- Focal Point: Have a central attraction that draws people in. This could be a large video screen, a live demonstration, an interactive element, or a striking product display.
- Branding and Signage: Your logo, brand colors, and key messages should be prominent and easily readable from a distance. Use large, high-resolution graphics on your back wall and hanging signs.
- Product Displays: Showcase your products effectively. Use shelving, pedestals, or interactive displays to allow for hands-on engagement.
- Lead Capture Area: Have a dedicated space for collecting contact information. This could be a reception counter with a tablet or a comfortable seating area for more in-depth conversations.
- Storage: Plan for hidden storage to keep your main area clutter-free. This is where you can store brochures, giveaways, and personal items.
- Lighting: Use strategic lighting to highlight your products, signage, and key areas of the booth. Good lighting can make a huge difference in attracting attention.
- Interactive Elements: Incorporate things that encourage attendees to stop and engage, such as touchscreens, product demos, games, or contests.
- Comfortable Seating: If your booth is large enough, providing a comfortable place for attendees to sit and talk with your team can lead to longer, more meaningful conversations.
The Attendee Experience. Ultimately, a great booth is about creating a positive experience for your visitors.
- Tell a Story: Your booth design should tell your brand’s story in a logical sequence. Guide visitors through the booth in a way that helps them understand who you are and what you offer.
- Keep it Simple: Don’t overcrowd your space. Leave enough “negative space” so your key messages and products don’t get lost.
- Staffing: A great booth layout is only as effective as the people working in it. Train your staff to be friendly, knowledgeable, and engaging.
Remember, every exhibitor and every exhibit design is different. There’s no one best answer for every inline or island exhibit. Take a moment at your next trade show to tour the floor during a busy time, like an hour or two after the show opens on the second day. Note which booths are busy vs. crowded. How are they handling the traffic in their space? Are there exhibits that seem congested and attendees are avoiding them? And are there booths which have no logical entrance or exit? Not knowing where to enter a booth space often deters attendees from taking that first step from the aisle into a booth space.
Trade Show Booth Layout Ideas: Smart Design Moves That Work
Creative inspiration—layout styles, accent elements, visual hierarchy, zones, and traffic control. Include images or sample diagrams here.
10×10 Booth Layout Ideas: Maximize Small Spaces
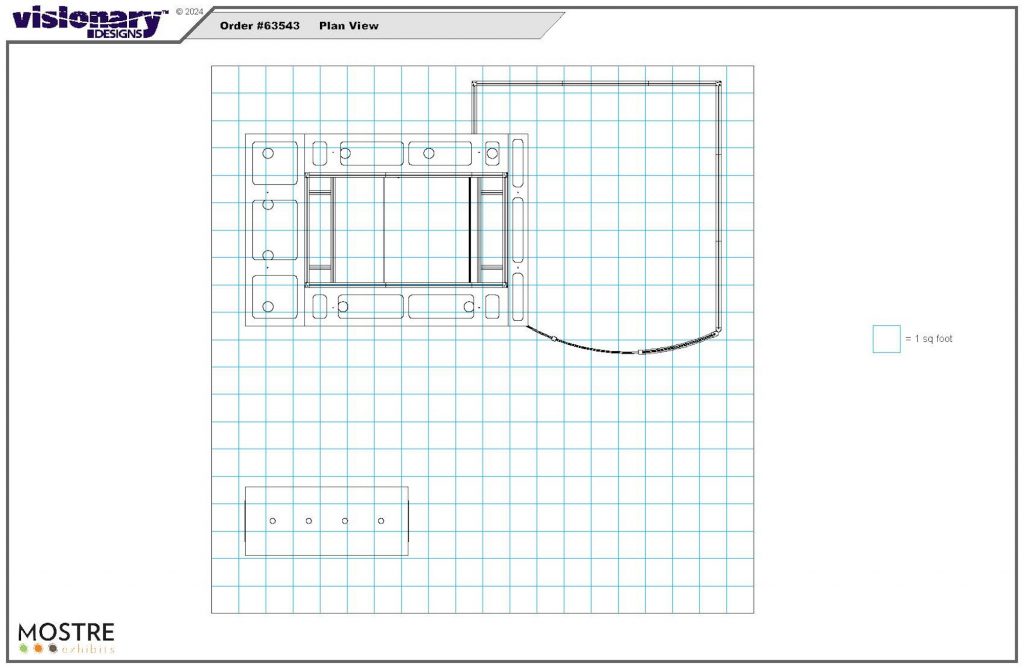
The smaller footprint of a 10 x 10 makes layout a priority. Organizing the traffic into and around the booth in a way that’s both logical and efficient ensures that every attendee feels comfortable navigating through the 100 sq. ft. space.
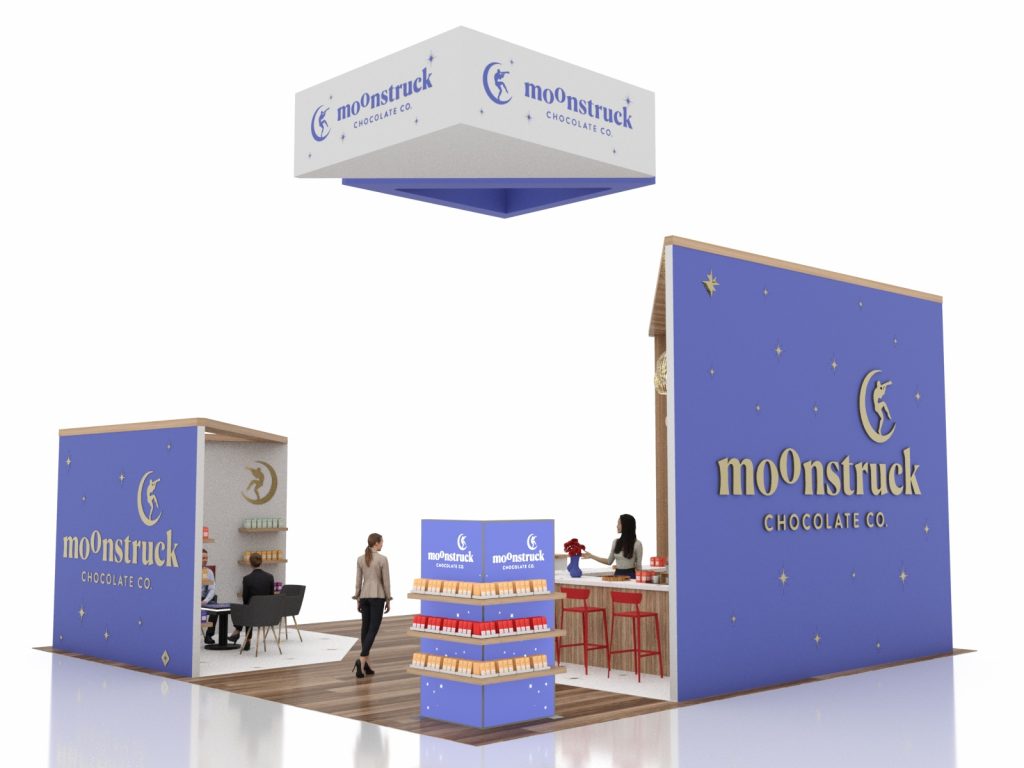
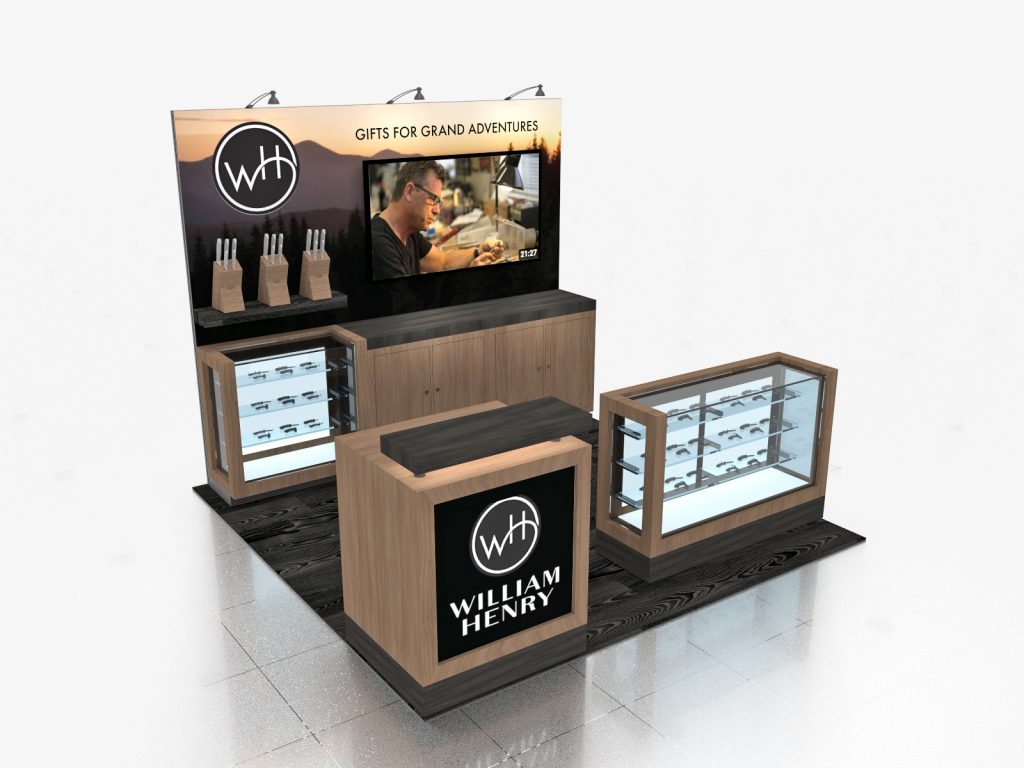
VK-1979 | Custom Inline. Even with limited space, this inline includes a reception/tasting station, product displays, and client seating. All within a 10 x 10 floorplan.
VK-1356 | Custom Lightbox. Custom isn’t exclusive to an island booth layout. This design has a large backlit graphic, iPad stand, monitor mount, and a bistro table with wireless charging.
VK-1322 | Inline Hybrid. Some corner inlines use a return wall to define the space. The VK-1322 is inviting while including a reception counter, large graphic, and a workstation with a monitor mount.
10 x 10 inlines often use the aisle as a secondary space to engage with attendees. That approach allows for more targeted interactions in the booth itself.
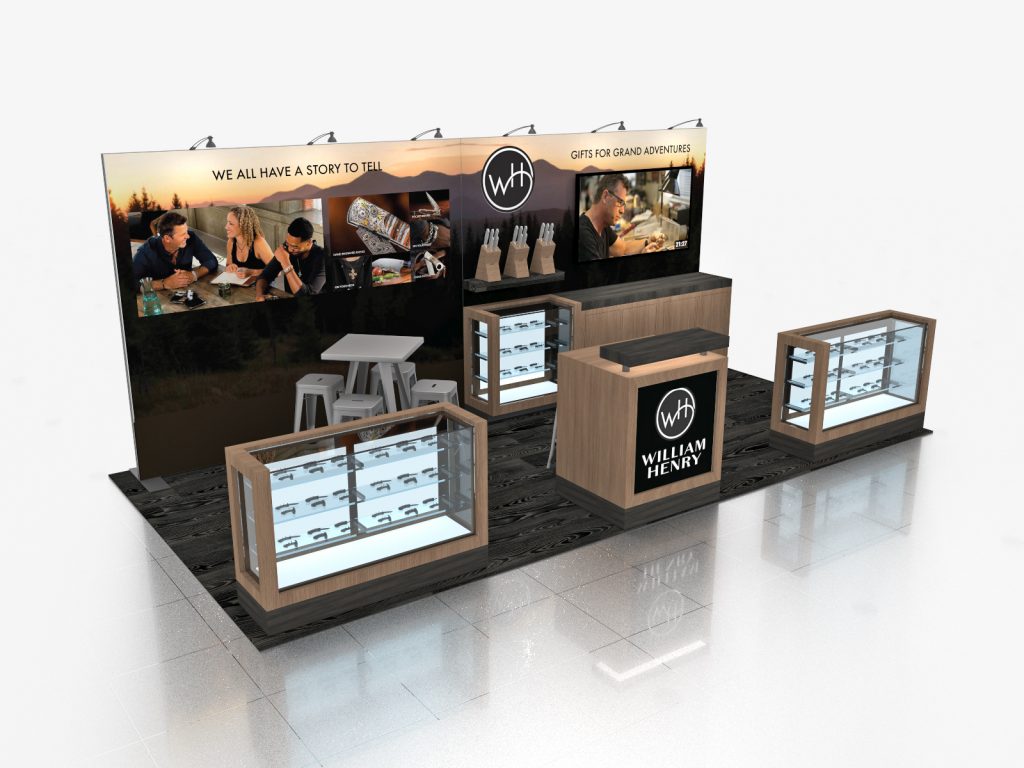
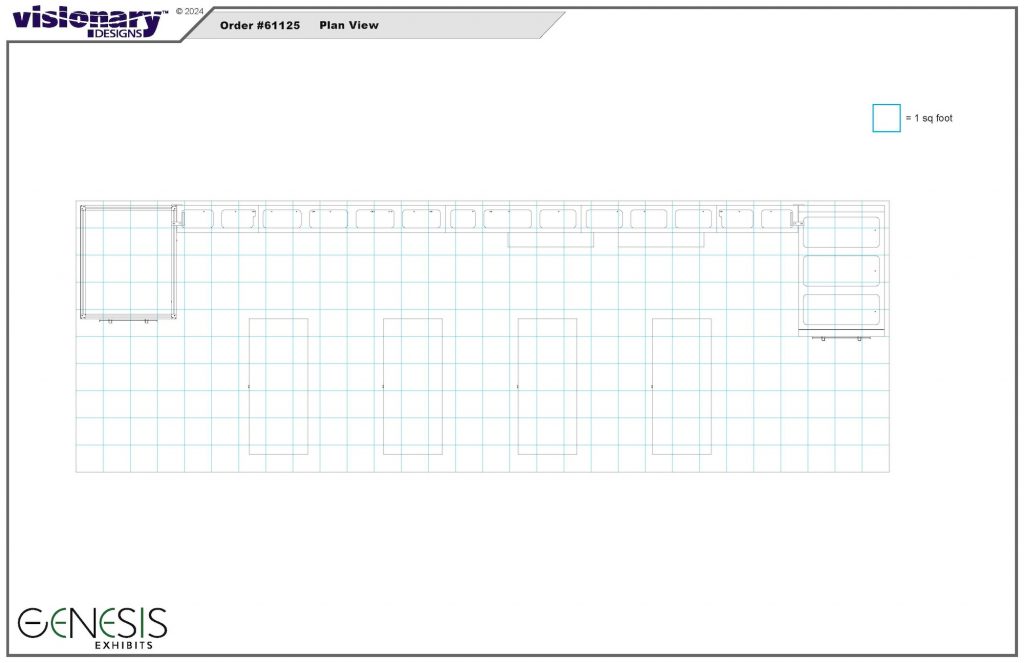
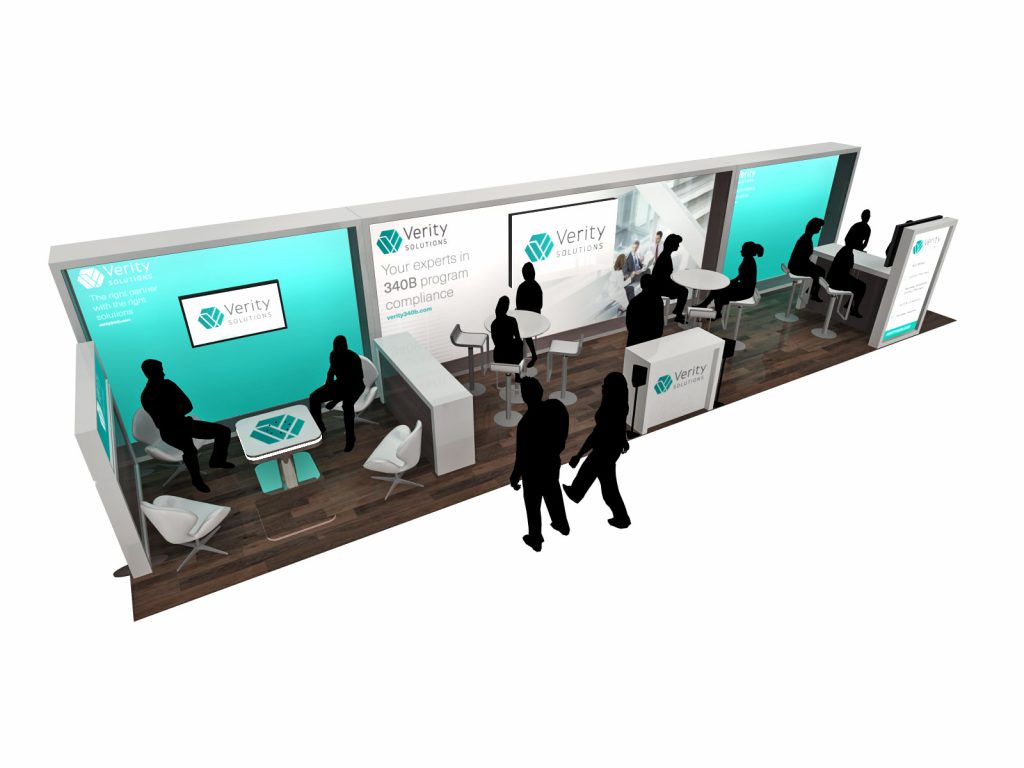
10×20 Booth Layout: More Room, More Strategy
A 10 x 20 booth space offers more flexibility for seating, demos, and presentations. However, the layout must be logical for both the booth staff and the trade show attendees. The three examples below demonstrate how to interact with multiple groups successfully.
ECO-2123 | Sustainable Inline. Creating the right “vibe” is essential to many brands. This design says, “Welcome, relax, and let’s chat.!”
GK-2018 | Modular Inline. Defining the space is critical in a 10 x 20. This booth layout is carved into two sections: one-on-one conversations and group presentations. Both can happen simultaneously, allowing more attendees to engage with the exhibitor.
SYK-2037 | Portable Inline. Portable doesn’t signify basic. The Symphony SYK-2037 has large format graphics, product shelves, monitor mount, and a seating area with a wireless charging table.
In a 10 x 20 booth, not only must the physical layout be logical, but also the graphics/branding. The messaging must match the intent for that section of the booth, whether it’s a presentation area for a larger audience or a workstation for one or two attendees.
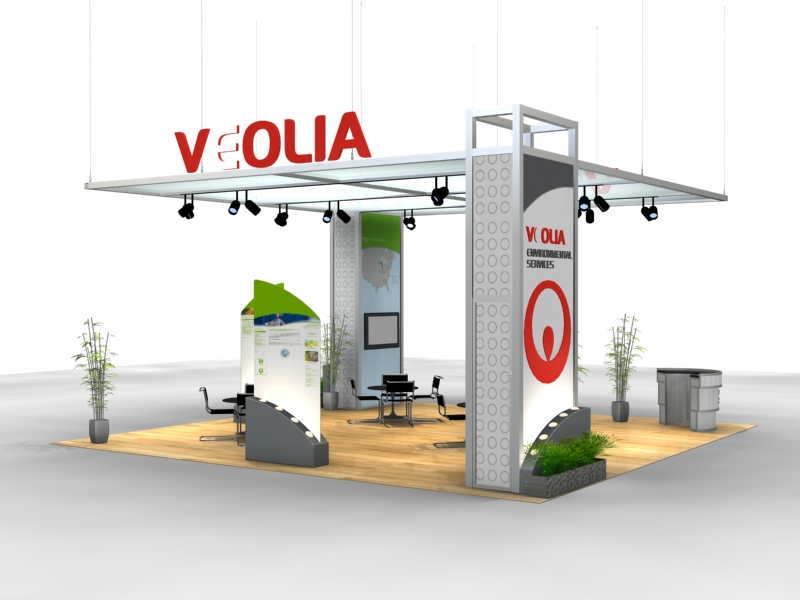
Large Trade Show Booth Layout: Islands, Peninsulas & Custom Builds
Islands offer greater layout flexibility… which means exhibitors often ignore the layout. Instead, consider how you want attendees to enter the booth space and exit it. Does your strategy require attendees to move around the space to experience products and services? Does your sales process require meeting space? Should the meeting space be private or semi-private? Does your layout encourage potential clients to “check-in” with a greeter or receptionist? The examples below show three island booth layout strategies.
RE-9212 | Rental Island. Imagine having four distinct seating areas, each with a monitor. The RE-9212’s open floorplan makes it easy to welcome attendees, while creating multiple conversation pods to maximize engagement.
VK-5214 | Custom Island. This 2-in-1 island layout duplicates the seating and reception layout on both sides with (2) counters and (4) tables and chairs.
VK-5166 | Island Exhibit. While the VK-5166 layout prioritizes a presentation area, it doesn’t ignore individual demos or seating. It includes two double-sided workstations with monitors and a seating area on the far side of the booth.
A well-planned island exhibit should always be designed to meet your specific marketing goals, whether it’s launching a new product, generating sales leads, or building brand awareness. The layout can be adapted to showcase multiple product lines or facilitate different types of interactions.
Vendor Booth Layout: Setup Tips That Drive Sales
An island booth’s open, 360-degree design is a powerful advantage. The key is to transform your booth from a passive display into an active “sales funnel” that guides visitors from initial curiosity to a qualified conversation and, ultimately, a conversion.
Here are four specific trade show island booth layouts and strategies to maximize sales:
1. The “Open and Inviting” Layout
This is the most common layout for attracting foot traffic. The goal is to eliminate any visual barriers that might deter attendees from entering.
- Layout: Place a central, eye-catching element in the middle, like a large product display, a video wall, or a demonstration station. Keep the perimeter open with low-profile counters or interactive kiosks.
- Zones: Create different zones without using walls. Use changes in flooring, lighting, or overhead signage to signal a transition from a general “browsing” area to a “demonstration” or “consultation” zone.
- Maximizing Sales: This layout is ideal for companies that rely on product demos to generate leads. The open design allows a large number of people to see your products in action, and the multiple entry points make it easy for them to step in and engage with staff.
2. The “Golden Triangle” Layout
Based on the retail principle of creating a clear path, this layout guides visitors through a specific sales journey within your booth.
- Layout: The three corners of the triangle are key “hot zones.” One corner is a reception/greeting area to welcome visitors. The second is a product demonstration/interactive zone to showcase your value. The third is a more private consultation or meeting area for closing deals.
- Zones: Use strategic placement of furniture and displays to subtly guide visitors from the entry point (first hot zone) to the demo area (second hot zone) and finally to the private meeting space (third hot zone).
- Maximizing Sales: This layout is particularly effective for B2B companies with a more complex sales cycle. It’s designed to qualify leads and move them from a casual inquiry to a committed conversation in a controlled and efficient manner.
3. The “Experience-Driven” Layout
This layout is all about creating an immersive environment that makes a lasting impression and encourages a deeper connection with your brand.
- Layout: Break from the traditional booth setup and create a “world” that attendees can step into. This might be a themed environment related to your industry (e.g., an outdoor camp setting for a camping gear company) or a multi-sensory experience with sound and light.
- Zones: Include multiple interactive elements like VR stations, hands-on product testing areas, or a “selfie wall” that encourages social media sharing. A cafe or lounge area can also be a key part of this layout, encouraging attendees to relax and engage in longer conversations.
- Maximizing Sales: This is a high-impact strategy for brand building and lead generation. While it may not focus on a hard sell, the memorable experience creates a strong pipeline of high-quality leads that are already emotionally connected to your brand. The “Instagrammable moments” also provide a huge ROI in terms of social media reach.
4. The “Demonstration Hub” Layout
This layout places your product demos at the center of the sales strategy, making them the primary draw and focal point.
- Layout: Dedicate a large, central stage or platform for live, scheduled product demonstrations. Arrange seating or standing areas around the stage to accommodate a crowd. The rest of the booth space can be used for smaller, one-on-one follow-up conversations.
- Zones: Use large video walls or screens to broadcast the demo and reinforce key sales messages. Staff stationed around the demonstration area should be ready to engage with attendees as they finish watching the presentation.
- Maximizing Sales: This is a fantastic layout for companies with a product that benefits from being seen in action. The live demos attract crowds and generate excitement, and the layout ensures that your sales team is in the right place at the right time to convert that interest into a lead.
Ultimately, the choice of a specific island layout – whether it’s open and inviting for high traffic, a strategic path for a complex sale, or an immersive experience for brand building – is a critical decision that directly impacts an exhibitor’s success. It allows businesses to stand out, attract their target audience, and turn a significant investment into a powerful engine for lead generation and, most importantly, sales growth.

Planning Your Booth Layout: Map, Mockup, Execute
Let’s be honest. Visualizing spatial dimensions is challenging. Most of us, if asked to draw a 20 ft x 20 ft. box on the floor, would struggle not only with the 20 ft. length but also with just drawing a somewhat perfect square. And that’s OK. That’s why there are CAD and rendering programs, along with exhibit designers, project managers, and detailers. They live in those spaces every day. Not literally, but you know what we mean. .
A well-designed trade show floor plan entices attendees into your booth through both visual and text messages and a comfortable and logical layout. In addition, the floor plan allows your staff to be efficient with your trade show strategy, whether that’s education via workstations, conversations at sofas or chairs, or demos using a stage and theater-style seating. Or, all of these and more.
No matter which layout you choose, remember these universal rules for maximizing sales can be summarized into five rules:
- Resist Clutter: Leave ample empty space (around 40% of the total area) to prevent a cluttered feel and allow for comfortable traffic flow.
- Use Vertical Space: Use tall, branded structures and hanging signs to grab attention from across the show floor.
- Integrate Interactive Technology: Touchscreens, VR/AR experiences, and interactive floor plans encourage visitors to spend more time in your booth.
- Add Private Meeting Space: Create a semi-enclosed or private area for in-depth conversations with qualified prospects, away from the noise of the show floor.
- Train Your Team: A great layout is only half the battle. Your team needs to be trained to engage visitors, guide them through the booth, and turn conversations into tangible sales opportunities.
A well-designed trade show exhibit booth layout is crucial for attracting attendees, showcasing your brand, and achieving your trade show goals. Exhibit houses specialize in trade show design and execution. They have a team of experienced professionals who understand traffic flow, attendee behavior, and the latest trends in booth design.
Let’s Design the Perfect Trade Show Booth Layout
Understanding how a well-designed trade show booth layout can supercharge your exhibit marketing potential gives you a decisive advantage over your competition. This is where having a solid trade show planning guide becomes invaluable. Exhibit space is expensive, so it pays to create an environment that maximizes your potential to attract attendees and turn leads into sales. Working with a professional exhibit designer is the best place to start. They’ll take your goals and your budget and create a design tailor-made to your needs.
Classic Exhibits has been designing and building trade show exhibit solutions since 1993. We’ve been honored as an Exhibitor Magazine Find-It Top 40 Exhibit Producers and an Event Marketer Fab 50 Exhibit Builders multiple times. Along with numerous Portable Modular Awards. With over 250 Distributor Partners throughout North America, there’s a Classic representative closer by.
Contact us today whether you need a durable hand sanitizer stand built to last, a rental display guaranteed to attract trade show attendees, or a custom 30 x 40 exhibit with all the bells and whistles. We’re not just different. We’re better.